Thursday, October 17, 2013

Madness, I tell you!

Today was a teacher work day. I had several parent conferences but was fortunate enough to have a 3 hour break in between. So what does any good teacher do on a work day with a 3 hour break? That's right, we start a project! Here are some pics of the madness...


I realized that I needed to organize my reading center a little better if I want my kids to be able to navigate. I had a great start last year but it just didn't work well. I had the bins labeled but they weren't in a logical sequence or order. So I have researched and searched for ideas and decided to bite the bullet today and get started on it. Previously my reading center looked like this:
Colored bins organized by topic and just laid out in a color pattern. I got to thinking about how difficult it was for me to navigate the bins, which means that it would be even harder for my students to navigate them. So, I took everything down and am in the process of reorganizing and color coding the bins. So far I have GREEN bins for books by characters, BLUE bins for books by author, ORANGE bins for books by skill and PURPLE bins for books by topic. I hope to finish up tomorrow and have the reading center ready for "business" during balanced literacy workshops next week! I'll post the finished project tomorrow.

Update!!! This is my newly organized system:

Really happy with how it looks now! 

Tuesday, October 1, 2013

Update on Balanced Literacy

So today we did rotation 2 that I talked about the other day and it went well. I spend a lot of time going over each activity and reviewing the rules and purpose for the activities as well. Instead of having my own group to work with I just monitored and guided the students as they worked. My RTI group was out of the room so we had fewer students which made it much easier. Here are a few pics of how I set up my rotations:
Here is the work job board. At the top you see Groups 1-4 with cards underneath. That is for rotation 1 when we are doing workshops of pre-planned activities for specific skills. We have 4 groups and they rotate to one per day. One group is always a teacher led group and the others are independent practice. The groups who are not working with me have 2 cards: the have to and the what next. This shows them where to go when they are finished and they don't have to ask me and interrupt my group. The bottom is our rotation 2 centers. There are 11 centers right now and I will change them out during the year. Students are paired into groups of 2-3 to do a specific task. You'll notice that some of the cards have a colored dot on them.
The colored dots represent activities that have a recording sheet or work mat to go with them. I have bins that are these colors and I put the materials for these activities in the bins. I teach the students to look for their dot and find the bin that matches to get their materials. It worked really well today and I'm excited to give more choices and activities later on!

Monday, September 30, 2013

Guided Reading Items

I have been trying to align my pocket chart and guided reading books with our sight word for the week. Since it's virtually impossible to find exactly what you need for the unit you're studying I had to create my own. To be honest, I like doing that because I can get exactly what I want. I have made 2 sets recently to go along with fall and apples. Both sets include a full page version for your classroom library, a 2-per page version to use for individual student books, pocket chart clip art and individual student practice pages for the sight words. You can grab them at my TPT store. My kids really like using them each week and I can tell they are really learning to recognize and read the words in context of print. I hope you can use them!


Balancing Act Part 2

My last post was a long one explaining how I am incorporating Balanced Literacy into my day in the first couple of weeks. Now that we have worked out the kinks we are moving up to the next level- dual rotations and individual practice. Ok, here goes. My colleague and I have been trying to wrap our heads around how to fit it all in during the day in a way that isn't overwhelming or frustrating and here is what we came up with. First, here is an overview of our day. (You'll notice that the rotations are broken up into 2 times of the day. That was for scheduling purposes)

8-8:30- unpack, announcements, morning work
8:30-8:45- calendar, morning meeting
8:45-9:00- phonics
9:00-10:30- Balanced Literacy Block (rotation 1)
***9:00-9:15- Shared Reading (pocket chart, big books, etc... focusing on a reading skill)
      9:15-9:45- Whole group writing
      9:45-10:30- Workshop rotations (T works with one group on a skill and aide assists the other 3 groups doing independent work from our work tubs: sight word activity, predictable reader, letter writing, etc... I put specific tasks that I want the students to complete for practice for the week in my work tubs. When students finish they have an assigned area to go to for early finisher activities: computer, promethean board, pocket chart, etc...)
10:35-11:05- lunch
11:05-11:30- bathroom/interactive read aloud (book for a skill with specific questions I want to          address or a book from our unit of study)
11:30-12:30- Related Arts and recess
12:30-1:15- RTI group/Balanced Literacy (rotation 2)
**** aide takes RTI group to another room to work on letters, sounds, reading, etc... remaining students rotate through the work jobs in groups of  2 or 3. Each student has a task to do for that day. As they are working I am pulling strategy groups to the back table for guided reading
1:15-1:45- Math and math workshops (whole group math on Monday, workshops T-TH)
1:45-2:10- Free centers

I use a work job board to let students know what they are to do for the day. If there is an activity that requires them to write or respond (ex. write the room or listen to reading) I have the sheet in a colored box and that work job card on the board has a coordinating colored dot so they know which box they need to pull from. There are 12 work job cards and they are rotated daily. It might take 2-3 weeks for all students to rotate through the jobs, but that's ok. The purpose is that they are doing meaningful work and practicing their reading and writing. It's ok if they don't get to every job every week as long as they are working with a purpose.  Having them organized and set up in a neat way has really helped me stay focused and helps the kids know exactly what they are supposed to do. My work job cards are available on my TPT site. You can grab them here.


That's Part 2. I'll take pictures of my work job board and rotation schedule and post them tomorrow so you can see how I make it work. Part 3 will focus on guided reading and writing. I hope you found this useful. If so, let me know. I'd love to know how you're fitting it all in!!

Friday, September 20, 2013

Balancing Act....Literally

We're rocking and rolling here at the Perch. I have an amazing class this year and we have been able to get going on things pretty well. This year we are implementing Balanced Literacy across the board with Fountas and Pinnell. It's not such a big deal in kindergarten since we've always done the workshop type centers, but it's going to be a little different this year. I'm going to blog about the transition to guided reading, which will officially begin in January. For now we are working on establishing the routine of workshop so the students know what the expectation is and learn how to work independently without interrupting me while I'm working with a group. It is something that is methodical and laborsome, but SO meaningful once they get it. SLOW and STEADY....that's the point....There's truth in that phrase.
So, here's Phase 1: Practice Makes Perfect.

The first 2 weeks of school:
Practice and Planning:
We work on procedures, rules and behavior expectations. We do everything whole group or in 2 small groups, each with its own teacher. We are working on using materials properly, cleaning up, cutting, tracing, gluing, knowing where to find materials in the room, following teacher directions, working with others, etc....The purpose of these first critical weeks is to set the tone and teach the fundamentals. Teaching them to cut, clue and replace caps on markers is of the utmost importance since they will be using those materials independently during workshop time. When you're working with a group you don't have time to stop and tell them where to find an extra glue stick or how to put the cap on a marker. My advice here- have a place in your room (mine is a large drawer) where all your extra materials are and have it organized. That way they know where to go and can easily find what they need without disturbing you to ask. 

Modeling:
Before I put any activities in workshop I teach it whole group. Week 2 of school we started using a HFW sheet to help us learn our sight words. I taught them step by step how to trace, color, cut, glue, and write the words. We did this whole group and my aide and I monitored and corrected students as they worked. Doing this and showing them what the expectation would be made it easy the next week when it was in the independent tub for Word Work. I did that with each of my activities. Everything whole group and step by painstaking step to teach the expectation.

Week 3: Workshop Begins
My workshops consist of 4 groups: 1 teacher led and 3 independent. I work with my literacy group and my aide monitors and assists students to make sure they are on task and doing the work correctly. This gives her a chance to pull students who may need additional support and work with them one on one. My group for the first 2 weeks of workshop is assessments. I'm testing students on the basics so that I will have information to use when grouping my students. At this point we are in heterogeneous groups. Eventually we will be in strategic groups, which will become guided reading groups.

First week of workshop students are only doing one thing. They have one task and then they are finished. We only stay in workshop about 20-25 minutes depending on the day. The second week I set up the centers chart to show them where they go when they finish. Each group has 2 assignments: the "have to" and the "now what". Once they are finished with the mandatory work and it is checked they rotate to their early finisher activity. Right now it's Promethean Board, Starfall on computers, Big Books, or pocket chart. I will open more activities as the year progresses.

This week we did week 2 of workshop. Next week I will be in week 3 and will start doing 2 rotations. I will meet with all groups once a week to work on a skill while my strategic group will work with me every day. Next week we will have a predictable book (In the fall I see...). Even though we are not working on guided reading yet we will be working on tracking print and reading words we know. Again, the basics, so that when we get to guided reading they are used to it and familiar with it so we can jump into our leveled readers and dig into the meat of our lessons. My strategic group will be doing the predictable sentence "In the fall I can see..." to teach those fundamental reading and writing skills. They will be dictating, tracking print, cutting and putting the sentence back together, finding sight words, etc...I want to get them familiar with sentence structure and tracking in a more meaningful way.

LONG post, I know, but the next ones will be shorter. This was 4 weeks worth of workshop rolled into one post. I hope you find it useful. I'll be posting my schedule and some pictures of my chart and other things to help you see how I'm doing it. This isn't a perfect system but it works for me!!


Monday, September 16, 2013

It's Pumpkin Time

Since fall is in the air and pumpkin time is going to be here before we know it I've decided to post my "Cute Kindergarten Math and ELA" unit on here. Here's the description:

Super cute pumpkin unit for kindergarten. This unit includes activities for reading, science and math. Skills covered in this unit include number and quantity to 10, ordinal numbers, sequencing events in a story, story retelling, reading, upper/lower case recognition, scientific inquiry. Aligned with Common Core standards for K5.

Included in this unit:
Upper/lower case letter match pumpkins (print out on cardstock then cut between the letters to make a puzzle)
Number word/numeral match pumpkins (print out on cardstock then cut between the number/word to make a puzzle)
Number/Quantity match cards (print out on cardstock then cut between the number/dots to make a puzzle)
Printable poem “The Five Little Pumpkins”
“The Five Little Pumpkins” cut apart poem
Pumpkin terms word search
Ordinal number match up
Ordinal number following directions activity
Number word match up
Numeral/Quantity matching activity
Poster for “Parts of a Pumpkin”
Pumpkin Investigation recording sheet

I hope you find it useful! My kiddos loved this one last year. Can't wait to use it again.

Emergent Reader Bundle

I've been working really hard trying to get a handle on the new CCSS and balanced literacy and, I'm happy to say, that it's finally coming together! I've been working on creating emergent readers to use during our interactive read aloud times and during balanced literacy workshops. I think I've finally found a way to merge the two seamlessly while giving students the practice they need to read and write the sight words and work on foundational reading skills. I've created pocket chart stories that have our word of the week. We read it aloud every day doing different activities with it. I then give each student a one page sheet to complete during word work time where they are reading the story and tracing the sight words on the sheet to get the practice of letter formation. It has been really successful so far and I'm excited to create more! I've got one bundle pack that I'm using next week and I just uploaded it to my TPT store. There are 2 versions of the story "In The Fall": a large version to use for a class book and a 2-per page version to print for individual student books. I've also included the clip art to use to create your own pocket charts or flipcharts as well as the word work sheet. You can grab it at my TPT store!

Wednesday, September 4, 2013

27, 28, 29, 20-10...

Well this year is off to a grand start! I had 29 students until yesterday. Yes, 29! You've heard the phrase "Herding Cats"? Well, we definitely were! Our enrollment was crazy high this year and we had that many kinders in our classes. Luckily we were able to add a new class to get our numbers down to 24, which is way more manageable! So, now that we're kind of in our holding pattern and in the air, it's time to get back to blogging. I hope to do updates a couple of times a week focusing on what we're doing in kindergarten and new technology tips I stumble across. So, for today's entry, I'm going to show you my class rules. Simple, yet effective. I decided to tie behavior to life skills this year. Rather than give students a list of do's and don'ts, I am teaching them to apply life skills to behavior. Our rules are simple: Be respectful, be responsible, be a friend, be your best. 4 simple life skills that I can apply to any situation. Students aren't sitting quietly? "Are you being respectful and responsible?", Students are calling ugly names- "You're not being respectful or being a friend". So far it seems to be having a positive impact on behaviors. I used my Silhouette Cameo and created a vinyl wall art to showcase these rules. I love how it turned out!!

Monday, August 26, 2013

Class Books For 21st Century Learners

This week we are working on name writing, both ours and those of our friends. We are emphasizing the first letter capital and the rest lower case and using proper letter formation. To do this we always do a Student of the Day and each student draws and writes the person's name for a class book. Well, this year I thought I'd take the class book to a new level using a great app I discovered this summer. If you haven't already gotten it I HIGHLY recommend MyStorybook Maker. It is one of the most kid friendly book making apps I've found. Right now I am using it with my students making a whole group book. I take a photo of the student of the day with the camera on the iPad then import it into the book and type our sentence "Jenny is my friend". Super easy. I can add borders, change the font, add sound effects, or record my voice reading the story aloud. I can then e-mail it as a PDF when we are finished and print it out to put in our book center. It was not a free app, but it was well worth the money. (I think it was around $3.99?) I can't wait to use this app more and more throughout the year, eventually putting the technology into the hands of my students and having them creating their own books.

Sunday, August 25, 2013

New Items!

I've got some great new things I've created for the beginning of the year. This week we are introducing our first sight word for the year, "my", so I created an early emergent predictable book to use with my kindies. It's super simple and easy to decode so it's the perfect way to begin the guided reading block for the year. It's called "Me" and is a 2-word per page book of the things associated with the little girl. The file has 2 options: a 2-per page set for individual student books and a large, single page for a class book. You can grab it at my TPT store by clicking on the photo below.
 
I also created a simple Editor's Checklist for kindergarten that covers the five main areas of kindergarten writing development: capitals, spacing, punctuation, spelling sight words correctly, and sound spelling unknown words. It's visually appealing and has different clip art on each page to help even your non-readers learn the steps. It's a great tool to have in the classroom to use to reference during whole group writing and for self monitoring during independent writing.
Enjoy!


Tuesday, August 20, 2013

The Perch! It's Perky!!

I've been hard at work getting The Perch ready for students to come tomorrow. There are still some things to do, but I wanted to share my room with you. I'm SO proud of the way it looks this year. I have worked hard to create a happy, inviting and fun atmosphere that students will want to be. I want the emphasis to be on happiness and joy so that those feelings and emotions carry over into our work and enhance the learning. So, here you go!
Cute owl on my hall window


Sign above my reading center. Each center has one: Read, Write, Build, Create, Explore, Become


Reading center

View of the front. How do you like my $10 writing center???

Art center

House center


Close up of the $10 writing center. It was a headboard for a twin bed. I found it at a local thrift store.
 I added an oil drip pan to use as a mobile word wall and VOILA, an inexpensive writing center~


Saturday, August 17, 2013

New Dry Erase Tables!!!

It's been a few weeks since my last post. We went on vacation and The Perch has been busy, but now it's back in gear for next year! So, here goes. First, my tables are coming together. I took off my super awesome, absolutely fabulous time saving miracle dry erase circles...so sad. But, they've been replaced this year! Last year my circles were made from Oracal 651 high gloss white adhesive vinyl, and they worked well for the purpose. By May they were pretty yucky. But, then again, we used them all the time. Last year was a trial run to see how it would go, and I loved them so much because of the time they saved. So this year I splurged and bought actual dry erase vinyl so that they will look better and be much easier to clean. Here's a pic:
Now, where did I get the vinyl, you ask? I got it from a company called AlumaPanel. We have the store in my town. They are a sign supply company that also sells to the public. It is a little bit pricey, but well worth the money. They sell it in a few different size combinations. My roll was 24"x6 yards, I think, and it was around $25. I know you're wondering why I decided to go with rectangles this year instead of circles, so here's the answer 1) Since the vinyl was expensive, I realized that I could get more bang for my buck out of the roll using straight lines rather than wasting so much cutting out circles, and 2) Doing them as rectangles is more like paper, so it will help with early writing skills. If you want to get your own dry erase vinyl they sell it in a lot of places online and on Amazon. If you don't want to splurge on the dry erase vinyl the Oracal 651 high gloss permanent vinyl will work in a pinch. BUT....I found that the Bic brand dry erase markers, in BLACK, work the best and leave the least amount of mess. Expo black is ok, but the colored expos leave a lot of mess. So, if you go that route try and use the Bic markers. If you're on a budget go Oracal. It's not the best results, but it will work and is fine. If you do have the extra money to spend I would highly recommend trying to get the dry erase vinyl. It will be well worth the money.

I might be selling these in my Etsy store later on after school gets started, but I'll definitely let you know. I'll post the rest of the room pics this week!

Tuesday, July 30, 2013

Back to school things

It's only 2 weeks away...2 weeks! Wow. I'd ask where the summer went but I have a pretty good idea where mine was. Anyway, I wanted to post some things from my TPT store to help you get ready for the school year. First up are my Owl Themed Classroom Job Cards. They are simple and adorable to help facilitate those jobs in your classroom. Grab it here!
I also created this simple set of "In This Classroom We..." cards to use. They are primary polka dot colors and come in 2 sizes Full page and quarter page to allow for more usability. Get them here!

I'll be making and posting more things over the next few weeks. Enjoy~

Monday, July 29, 2013

Shakedown at The Perch...

I've been in a rut. If you've been teaching a while then you've been there. If you're just starting out, you'll get there. I keep reading all this research about integrating technology and going to a more blended/flipped approach to learning. It looks great. It's engaging and interactive. It gives teachers more freedom to work on individual student levels. Wow, I thought. I wonder what that would look like in Kindergarten? Last week my principal sent us a link to an article she found on Twitter about a school district who had piloted a blended classroom program, one of those being a kindergarten class. I was so encouraged reading about all she's done and how much more productive it made her and how much more her students learned. I e-mailed the teacher and now have a partner for collaboration. I'm going to start small this year by completely blending math from the start. Once that takes off I plan on adding other areas as I can. I plan to blog about the process over the course of the year. In the meantime, here are a few great apps I found for math.

The following apps are from Classroom Focused Software, the same people who created 10 Frame Fill. Most are free or .99.

1) Line Em Up- students are given a number line and number tiles and have to put the numbers in sequence. You can vary the layout of the tiles, sequential or random, and set the starting and ending number. FREE
2) Count Sort- students can count, sort, estimate and amount, use a 10 frame, and practice more/less using digital counting chips. You can set the min/max numbers of chips. On the sort feature you drag the chips into a small grid which keeps a running total of the number in that grid. It also keeps a total on the top of how many you've used altogether making it a part/part/whole mat. Lots of good stuff in this one. FREE
3) Pattern Blocks- this app is from Braining Camp and is laid out like a SmartBoard. There are grid options (I like the triangular grid because the pattern blocks fit nicely into it) and piece options. Students manipulate the digital pattern block pieces just as they do wooden ones. Really like this one. (.99)


Friday, July 26, 2013

Chevron and Polka Dots and Owls, OH MY!!

With summer slowly winding down and the school year only 3 weeks away, that means only one thing...time for some of those Pinterest projects I've been putting off. Obviously being in a sling for 3 weeks from surgery has had an impact on my crafting, but I did get 2 things knocked off my To Do list this week: a magnetic board for outside my door and a Word of the Week plaque for inside my door. Cute huh!

 The magnetic board is a repurposed cookie sheet I covered with fabric and mod-podged. I'm going to add the words "We've Flown To..." and then have various cards for the different places we might go. The Word of the Week plaque (which is hanging in front of my 4-year old's drawing of me) will be what my students see as they leave the room each day. Feel free to copy, pin and share!!

Tuesday, July 23, 2013

For Your Sanity, a Tutorial For iPad

One of the things I taught in my workshop this week was how to restrict students from accessing inappropriate content on your iPad. One of my absolute favorite tricks for locking down the iPad is to put it into "Guided Access" mode. Guided Access allows you to lock the app to prevent students from exiting out and doing something they're not supposed to be doing. It's really purposeful in kindergarten and the early grades. The upper grades can probably get around it, but you can safeguard it again by entering a passcode they have to know in order to exit. It's almost foolproof. FYI- you must currently be running IOS 6 or higher to have this feature. If you don't see it you'll need to apply the update. Here's the tutorial.

1) Select the "Settings" icon on the home screen
2) Under "Settings" click on the “General” icon in the menu on the left 
 3) Scroll down until you see "Accessibility" about 3/4 of the way down the screen. Click on it.
4) At the top of the screen you will see "Guided Access". Make sure the button is slid so that it reads "ON".


Notice that it has an option for "Set Passcode" underneath. If you truly want to safeguard your iPad you will need to select that and enter a 4 digit passcode. That way if your kids, who are way smarter than you are when it comes to these things, figure out how to disable the guided access, they'll still have to enter a passcode to truly disable. It just adds another layer of protection.
5) Exit out and you're ready to go.
6) Open the app you want your students to use. Once open, triple click the home button at the bottom of the iPad. Your screen will shrink and look like this:
Notice that there is a blue button at the top right that says "Start". Click on that button and Guided Access will begin. Now your students are locked into the app and cannot exit until you disable it. When you're ready to disable and move on simply triple click the home button again. If you've chosen to add a passcode option you will enter it then. Then choose the button in the top left that says "End" and Guided Access will end and allow you to exit out.

Easy peasey lemon squeezy!

Thursday, July 18, 2013

Wow! I'm kind of speechless (is that even possible?)

I'm such a newbie to blogging and there are so many teachers that I follow and admire because they have such great ideas. Well, today I had a very humbling experience. I got a message from Leslie at KindergartenWorks informing me that my blog post about my dry erase circles was chosen as one of the 25 most clever classroom ideas at www.BuzzFeed.com. I was floored! My little blog and it's simple idea was featured? Really? Wow. Just, wow. Now most people might not think it's that great, but I'm flattered and humbled to be recognized for something so simple. Here's a link to the original post in case you missed it.
http://www.kinderkeri.blogspot.com/2012/10/these-are-few-of-my-favorite-things.html

How To Make a QR Code

So last year I saw a really cool idea about using the QR code to give parents your contact information. I did it last year and got really good feedback from parents about how easy it was to put my contact information into their smartphones. With back to school being just around the corner I'm going to share the knowledge with you. Bear in mind that they will also need to have a QR reader app in order to scan your code. Mention that if they ask.

1) First, you need to download a QR Reader app. The one I used is simply called QR Reader and is free. There is a version for iPhone and iPad. The directions that follow are for this app but I'm sure the steps are pretty much the same regardless of which app you choose to use.
Creating a QR Code For Your Contact Information

2) Make yourself a contact in your contacts folder. Include your "school name", phone number, e-mail address, website, etc... Basically any information a parent might need quickly. Save the contact.
3) Open the QR reader app and choose "Create". On your iPhone it is the wrench icon at the bottom of the screen. On your iPad it will be in the feature menu on the left.
4) You will see a menu of options for your QR code. You want to choose "Contact- meCard". From there a pop up menu will appear. Select "Pick Contact" and locate your information you stored earlier.
5) Once you have selected yourself your information will appear for you to verify. Click "Create". You will see a preview of your Mecard with the QR code beside it.
6) From there you will click "Share" and your options available. I usually e-mail it to myself so I'll have it in .jpeg form to use on newsletters. You can also choose to print it from here if you've got printer capability.
7) If you e-mail it to yourself you can right click on the QR code and "Save Image As" to your computer and then embed it into whatever you need to give to parents. I put mine on a sheet with a sign beside it telling parents to scan it to put your contact information into their phones.

I hope you find this information useful. Let me know how you liked it! 

Wednesday, July 17, 2013

Great Apps For iPad

In my session at Summer Academy this week I'm teaching others the basics of how to use iPads effectively in their classrooms in a variety of ways. I'd like to share a few ideas with you and offer some suggestions for apps I really like!!

1) Make digital class or student books- I found My Storybook Maker recently and fell in love with the ease of use of it. It's totally kid friendly and allows students to easily manipulate a template and insert photos, clip art (the library of clip art is great), and text. There is also a feature where students can record themselves reading the story so it will play back when they publish and read it. If that's not enough to make you love it you can even e-mail it to yourself or parents and have an amazing student work sample to show writing progression. It also covers almost every technology standard for early grades. It's $3.99 but worth the money.
2) Use for student assessment- Have you heard of Evernote? If not, you need to know about it. Evernote is an amazing way for you to take anecdotal notes of students and insert photos, videos or audio and save in a digital portfolio. It is a free app and is one of the top rated apps in the education world. I still don't even know everything this app is capable of but found a great free tutorial on Pinterest. You can capture it here.
3) Use it to take running records- Oh my goodness, I cannot tell you how excited I am about this next app. If you're using Fountas and Pinnell for balanced literacy and assessments I am so happy to tell you that they are releasing their running records app in August. You will be able to take running records on your iPad, e-mail them to your computer and save them in student folders so that you only have to print the one you need. Are you half as excited as I am about this???? As far as I know it will be $14.99 but will be well worth the money. Cannot wait for this one.
4) Use it for individual student work. That one's kind of a no brainer, I think, but here are some good apps I like for student skill practice.
Great Apps For Skill Practice
Montessori Crossword- It's a great app for students to practice phoneme segmentation or focus on spelling words using particular sounds/blends/diagraphs/vowel patterns. Love it. If you use RTI with your students it aligns very well with the skills used in the program. It's visual, tactile, auditory and kinesthetic so you've got all your students covered. You will not be disappointed with this $1.99 app.
Ten Frame Fill- Can I just say, "Wow"? This app is so aligned with Common Core that it's scary. Students practice making groups of 10 using a tens frame. You can set the parameters so that the frame is filled in in sequential order or in a random pattern. Students can either count the empty spaces to figure out or they can use the chips that are on the board to physically fill it in. There's also a feature that allows you to show the number sentence in 6 different ways to model addition AND subtraction. It's great and one you absolutely need on your iPad.

This post is super long so I'll stop there for today. I'll post an update later this week with more recommendations for apps and technology tips! Have fun playing with these! Got an app you love? Share it in the comments.

Tuesday, July 16, 2013

Workin' For a Livin' AND...Giving away FREE stuff!!!!

So I haven't posted lately because it's hard to type...I just had shoulder surgery stemming from an accident in February and I'm confined to a sling for the next 2-3 months...so...here I am finally back at it today. I am privileged to be teaching a class at our district's Summer Academy professional development this year. I'm teaching early childhood educators how to use iPads effectively with their young students. How to safeguard the device, find quality apps, how to use when you only have one, etc...Today was day 1 and it went really well. 2 more sessions to go. I'm going to post my PowerPoint and handouts here after my session is over for you to grab if you'd like. Look for it sometime Friday.

Now for the best part. We hit 50 followers! Yay. I'm so excited that my little starter blog is getting followers. I'd love to give away a freebie from my TPT store. Comment below and I'll select someone on Friday, July 19 to choose any item from my TPT store! Let's see how this goes! Thanks for following me and my little blog.

Wednesday, June 26, 2013

Sneak Peek

I decided that The Perch needed a little extra "something" for next year, so I incorporated more color. I found this awesome pink chevron fabric at Hobby Lobby (6.99 a yard then used my 40% off coupon). I couldn't wait until August to put it up so I went ahead and covered my bulletin boards before school got out. Here is the sneak peek. I'm revamping the entire room next year to allow for balanced literacy and changing some centers around, so I'll post more pics when it's all said and done. What do you think?


Tuesday, June 18, 2013

Amazing Find at IKEA

I made my first trip to IKEA this week and was just astonished at all of the amazing things they have to offer. Let me just say that I am a storage bin addict, so it was really dangerous and detrimental to my health to be there. But, I practiced restraint and only got little things. But, I have to let you know about my deal of the century. I've been looking for the magazine file boxes for my Read To Self storage but they are pricey, even online at Amazon. IKEA had a pack of 5 for.......are you sitting down?.........$1.99. That is right. One dollar and 99 cents for a pack of 5 cardboard magazine boxes. It was no fluke either. It was just their price. So, if you need them and are within driving distance to IKEA then run, don't walk, and snatch them up before they're gone!!

Thursday, June 13, 2013

The Etsy Betsy Store

Well folks, I've been thinking about it for a while and have decided to open an Etsy store to sell vinyl decals, gifts, and...drum roll please....my Dry Erase Circles!! That's right. I'm going to be making and selling the dry erase circles I blogged about earlier in the year. I'm working out the details for the shop but I hope to have it up and running this weekend. I'll post with the link once it's ready to go. I plan to focus on things for the classroom but also offer gifts and crafts as well. I'm super excited and also super nervous at the same time. Fingers crossed!

Wednesday, May 29, 2013

I Think I Can...I Think I Can...

Not sure about you but here in SC we have 6 days left in this year. It's been a roller coaster in my professional career this year. I've had the highest of highs and the lowest of lows. I've laughed, cried, screamed (in both frustration and excitement) and danced through this year while growing in ways that I never would have dreamed. I hate that circumstances have kept me from blogging about the wonderful things going on in the Perch, but there's always next year. If you're like me you start planning for next year before this one has even ended! I've got my Pinterest boards full of ideas to use next year! Hopefully this summer will give me the time to work on those. That is in between chasing my 17 month old and 4-year old! I hope that the end of your year is amazing and special and that your children leave your room so well prepared for the next grade. We always have such high hopes and lofty ideas about what we hope to accomplish in the 9 months we've been given. We worry and stress when life gets in our way yet, somehow or another, they learn in spite of us. Isn't it amazing? Does any other profession have the satisfaction of changing lives and minds the way we do? I don't think so. I'm working on my EOY bulletin board that will be up in August and will post it when I finished. It's called "Owl I Really Need To Know I Learned in Kindergarten". I found the quotes from Robert Fulgham's book and thought it would be both a great closing sentiment for my current kindies and a great beginning sentiment for my newbies in the fall. I mean, after all, don't we kindergarten teachers teach them everything they need to know to succeed in life!! If you can stand in a line, wipe your nose, tie your shoes, sit in a chair, walk down a hallway, wash your hands, play nicely, share your things, eat with a fork, open your milk carton, read a book and write a sentence then thank a kindergarten teacher! Ok, enough with the sappy sentiments. Time for bed!

Sunday, May 5, 2013

Look What I Found!

I've had so many questions about my dry erase circles, mostly about where to find them. Well, stop searching because I found some at Michael's! They are pricey (much more than I paid), but they are available. A 3 pack was $11.99 (steep) but if you use their standard coupon of 40% off then it's not too bad. Happy shopping!

Saturday, April 27, 2013

Summer School

I am super excited. I found out last week that I will be presenting a workshop for our district during our Summer Academy PD sessions this year! Yay!! My session is called "There's An App For That: Using iPads in the Early Childhood Classroom". I have had a lot of success using them with my students and I want to dispel any fears and hesitations teachers of young children my have in letting students use them, and to show them how to effectively use them with our young learners. I am already getting my thoughts together about my presentation and will share my knowledge (limited as it may be) with you on here as well!

Monday, March 18, 2013

Take Me Away.....

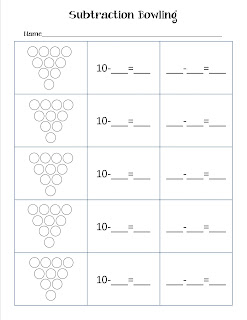
Oh subtraction, how fun are you? Are you teaching subtraction right now? Are you pulling your hair out yet? I actually love teaching subtraction because it gives way for some really fun hands-on activities. (Who doesn't love bowling??) We do a lot of bowling in my room during subtraction time. In years past I have used 2 liter bottles and a playground ball and bowled whole group style. Last year I discovered a bowling set in our after school storage closet! Anyhoo, if you haven't tried it yet, I encourage you to try teaching bowling with subtraction. It's an amazing way to teach them to take away from a set. I always wait until week 2 after I've taught the concept with taking away just 1. By week 2 they've got it and are ready to begin working on more complex problems. I'm uploading a SUBTRACTION BOWLING FREEBIE to use for your lessons. It's a recording sheet they can use to record their "frames" when they bowl. Column 1 has the bowling pin set to use for marking off. Column 2 has the first frame "10-___=___". Column 3 has a blank sentence to record the new set of pins from the first roll "____-____=____". I thought this was was good to reinforce the idea that we start with a certain amount and then take away from that amount. Anyway, you can grab it for FREE at my TPT store.

Tuesday, March 12, 2013

New Classroom Library

I am so excited. I have a student teacher right now and she is getting ready to begin her full time teaching for 2 weeks (HELLO organization time!!), so I got a jump start on a project today. One of the most pressing issues facing me this year is my classroom library. We have just implemented Fountas and Pinnell and balanced literacy at school this year and will be fully implementing it next year. I'm very excited about it! However, looking at my classroom library, I realized that I had to really step it up and make it a place my students would enjoy using. A colleague of mine recommended the website Steps To Literacy to find book bins. I just ordered the Fun Colors set of 20 for my library. They are GREAT! They are so bright and happy and just make the center look beautiful and inviting! Since my room theme is lime green with white poka dots they are the perfect colors. Plus, I love them so much that I just ordered 3 more sets. Here is a picture of them placed on my shelves. I am in the process of organizing my books today and tomorrow, but I wanted to share a picture because they are so pretty! Once I get the bins labeled and open the center back up I'll post an "after" pic!

Monday, March 11, 2013

Sight Words Flash

I don't know about you, but my kids are having trouble learning some of those tricky "rule breaking" sight words (said, have, they...). We go over and over them but they are still so tricky to get. To try and help them learn them I've created a little thing I call "Sight Words Flash". It's a PowerPoint where the slides flash for 2 seconds at a time. I put it up on my Promethean Board at least once a day and have the students read the words aloud as they flash on the screen. They really like it. I'm hopeful that the repetition of doing it daily will help to reinforce those words. I've created several different versions based on our district words and Fry's sight words lists for kindergarten. You can pick them up at my TPT store! Click on the links below to go tomy TPT store.


Tuesday, March 5, 2013

Common Core Freebie

We are in our second year of math common core here in SC and our first year of ELA common core. It's been a busy year of reinventing the wheel at the perch. We've got a new reading series, new handwriting, a new guided reading program, balanced literacy along with the new standards. Needless to say, it's been hectic, but in a good way for sure. I've been trying to keep up with everything and create new things as we approach new units. I stumbled across an awesome blog called Math Coach's Corner. If you're not following her you need to be. She's an IC in Texas and she knows Common Core to the...well, core! (pardon the pun). Anyhoo, one of the primary focuses of CC now is subitizing, which is being able to look at a number or quantity and instantly know the sets. In kindergarten we're doing this with dots, tens frames, tallies and fingers. I've seen so many worksheets to help students with subitizing and decided to adapt one for myself. I'm posting it here for you. It's called "6 Ways to Make 5" and you can get it free at my TPT store. I had my students use 2 colored bingo dobbers to create their sets of 5 and them write the corresponding number sentence to the side. It really helped my lower group understand the concept of making 5. I hope you enjoy it!

Thursday, February 28, 2013

Love Target to the Core (Common Core, that is)

I was at Target this week and made my usual first stop on the dollar aisle. Guess what I found? Work mats for addition and subtraction! Not just any old work mats, but ones that go along with addition and subtraction for CC! Take a look...

This is the front. There are spinners where students can spin and write their own problems. Isn't that great? But wait. Here's the best part...

Not only are the problems vertical AND horizontal, but do you notice the equal signs??? That's right. The sums and differences are on both the right AND the left! How's that for teaching the concept of the equal sign! Goes right along with CCSS for math! I bought  6 of each and plan to use them in math workshops next week for independent work. Now go to Target and get yours before they're all gone!!!